接上文: kubernetes CI/CD建设之 三.Jenkins BlueOcean
安装 Harbor Harbor 支持多种安装方式,源码目录下面默认有一个安装脚本(make/install.sh),采用 docker-compose 的形式运行 Harbor 各个组件,和前面的课程一样,我们这里依然还是将 Harbor 安装到 Kubernetes 集群中,如果我们对 Harbor 的各个组件之间的运行关系非常熟悉,同样的,我们可以自己手动编写资源清单文件进行部署,不过 Harbor 源码目录中也为我们提供了生成这些资源清单的脚本文件了(make/kubernetes/k8s-prepare),我们只需要执行下面的命令即可为我们生成所需要用到的 YAML 文件了:
1 $ python make/kubernetes/k8s-prepare
当然了如果上面的一些基本配置不能满足你的需求,你也可以做一些更高级的配置。你可以在make/common/templates目录下面找到所有的 Harbor 的配置模板,做相应的修改即可。
不过我们这里给大家介绍另外一种简单的安装方法:Helm,Harbor 官方提供了对应的 Helm Chart 包,所以我们可以很容易安装。
首先下载 Harbor Chart 包到要安装的集群上:
1 $ git clone https ://github.com/goharbor/harbor-helm
切换到我们需要安装的分支,比如我们这里使用 1.0.0分支:
1
2
$ cd harbor-helm $ git checkout 1.0.0
安装 Helm Chart 包最重要的当然是values.yaml文件了,我们可以通过覆盖该文件中的属性来改变配置:
1
2
3
4
5
6
7
8
9
10
11
12
13
14
15
16
17
18
19
20
21
22
23
24
25
26
27
28
29
30
31
32
33
34
35
36
37
38
39
40
41
42
43
44
45
46
47
48
49
50
51
52
53
54
55
56
57
58
59
60
61
62
63
64
65
66
67
68
69
70
71
72
73
74
75
76
77
78
79
80
81
82
83
84
85
86
87
88
89
90
91
92
93
94
95
96
97
98
99
100
101
102
103
104
105
106
107
108
109
110
111
112
113
114
115
116
117
118
119
120
121
122
123
124
125
126
127
128
129
130
131
132
133
134
135
136
137
138
139
140
141
142
143
144
145
146
147
148
149
150
151
152
153
154
155
156
157
158
159
160
161
162
163
164
165
166
167
168
169
170
171
172
173
174
175
176
177
178
179
180
181
182
183
184
185
186
187
188
189
190
191
192
193
194
195
196
197
198
199
200
201
202
203
204
205
206
207
208
209
210
211
212
213
214
215
216
217
218
219
220
221
222
223
224
225
226
227
228
229
230
231
232
233
234
235
236
237
238
239
240
241
242
243
244
245
246
247
248
249
250
251
252
253
254
255
256
257
258
259
260
261
262
263
264
265
266
267
268
269
270
271
272
273
274
275
276
277
278
279
280
281
282
283
284
285
286
287
288
289
290
291
292
293
294
295
296
297
298
299
300
301
302
303
304
305
306
307
308
309
310
311
312
313
314
315
316
317
318
319
320
321
322
323
324
325
326
327
328
329
330
331
332
333
334
335
336
337
338
339
340
341
342
343
344
345
346
347
348
349
350
351
352
353
354
355
356
357
358
359
360
361
362
363
364
365
366
367
368
369
370
371
372
373
374
expose: # 设置暴露服务的方式。将类型设置为 ingress、clusterIP或nodePort并补充对应部分的信息。 type: ingress tls: # 是否开启 tls,注意:如果类型是 ingress 并且tls被禁用,则在pull/push镜像时,则必须包含端口。详细查看文档:https: enabled: true # 如果你想使用自己的 TLS 证书和私钥,请填写这个 secret 的名称,这个 secret 必须包含名为 tls.crt 和 tls.key 的证书和私钥文件,如果没有设置则会自动生成证书和私钥文件。 secretName: "" # 默认 Notary 服务会使用上面相同的证书和私钥文件,如果你想用一个独立的则填充下面的字段,注意只有类型是 ingress 的时候才需要。 notarySecretName: "" # common name 是用于生成证书的,当类型是 clusterIP 或者 nodePort 并且 secretName 为空的时候才需要 commonName: "" ingress: hosts: core: core.harbor.domain notary: notary.harbor.domain annotations: ingress.kubernetes.io/ssl-redirect: "true" nginx.ingress.kubernetes.io/ssl-redirect: "true" ingress.kubernetes.io/proxy-body-size: "0" nginx.ingress.kubernetes.io/proxy-body-size: "0" clusterIP: # ClusterIP 服务的名称 name: harbor ports: httpPort: 80 httpsPort: 443 # Notary 服务监听端口,只有当 notary.enabled 设置为 true 的时候有效 notaryPort: 4443 nodePort: # NodePort 服务名称 name: harbor ports: http: port: 80 nodePort: 30002 https: port: 443 nodePort: 30003 notary: port: 4443 nodePort: 30004 # Harbor 核心服务外部访问 URL。主要用于: # 1) 补全 portal 页面上面显示的 docker/helm 命令 # 2) 补全返回给 docker/notary 客户端的 token 服务 URL # 格式:protocol: # 1) 如果 expose.type=ingress,"domain" 的值就是 expose.ingress.hosts.core 的值 # 2) 如果 expose.type=clusterIP,"domain" 的值就是 expose.clusterIP.name 的值 # 3) 如果 expose.type=nodePort,"domain" 的值就是 k8s 节点的 IP 地址 # 如果在代理后面部署 Harbor,请将其设置为代理的 URL externalURL: https:# 默认情况下开启数据持久化,在k8s集群中需要动态的挂载卷默认需要一个StorageClass对象。 # 如果你有已经存在可以使用的持久卷,需要在"storageClass" 中指定你的 storageClass 或者设置 "existingClaim" 。 # # 对于存储 docker 镜像和 Helm charts 包,你也可以用 "azure" 、"gcs" 、"s3" 、"swift" 或者 "oss" ,直接在 "imageChartStorage" 区域设置即可 persistence: enabled: true # 设置成"keep" 避免在执行 helm 删除操作期间移除 PVC,留空则在 chart 被删除后删除 PVC resourcePolicy: "keep" persistentVolumeClaim: registry: # 使用一个存在的 PVC(必须在绑定前先手动创建) existingClaim: "" # 指定"storageClass" ,或者使用默认的 StorageClass 对象,设置成"-" 禁用动态分配挂载卷 storageClass: "" subPath: "" accessMode: ReadWriteOnce size: 5 Gi chartmuseum: existingClaim: "" storageClass: "" subPath: "" accessMode: ReadWriteOnce size: 5 Gi jobservice: existingClaim: "" storageClass: "" subPath: "" accessMode: ReadWriteOnce size: 1 Gi # 如果使用外部的数据库服务,下面的设置将会被忽略 database: existingClaim: "" storageClass: "" subPath: "" accessMode: ReadWriteOnce size: 1 Gi # 如果使用外部的 Redis 服务,下面的设置将会被忽略 redis: existingClaim: "" storageClass: "" subPath: "" accessMode: ReadWriteOnce size: 1 Gi # 定义使用什么存储后端来存储镜像和 charts 包,详细文档地址:https: imageChartStorage: # 正对镜像和chart存储是否禁用跳转,对于一些不支持的后端(例如对于使用minio的`s3`存储),需要禁用它。为了禁止跳转,只需要设置`disableredirect=true`即可,详细文档地址:https: disableredirect: false # 指定存储类型:"filesystem" , "azure" , "gcs" , "s3" , "swift" , "oss" ,在相应的区域填上对应的信息。 # 如果你想使用 pv 则必须设置成"filesystem" 类型 type: filesystem filesystem: rootdirectory: /storage #maxthreads: 100 azure: accountname: accountname accountkey: base64encodedaccountkey container: containername #realm: core.windows.net gcs: bucket: bucketname # The base64 encoded json file which contains the key encodedkey: base64-encoded-json-key-file #rootdirectory: /gcs/object/name/prefix #chunksize: "5242880" s3: region: us-west-1 bucket: bucketname #accesskey: awsaccesskey #secretkey: awssecretkey #regionendpoint: http: #encrypt: false #keyid: mykeyid #secure: true #v4auth: true #chunksize: "5242880" #rootdirectory: /s3/object/name/prefix #storageclass: STANDARD swift: authurl: https: username: username password: password container: containername #region: fr #tenant: tenantname #tenantid: tenantid #domain: domainname #domainid: domainid #trustid: trustid #insecureskipverify: false #chunksize: 5M #prefix: #secretkey: secretkey #accesskey: accesskey #authversion: 3 #endpointtype: public #tempurlcontainerkey: false #tempurlmethods: oss: accesskeyid: accesskeyid accesskeysecret: accesskeysecret region: regionname bucket: bucketname #endpoint: endpoint #internal: false #encrypt: false #secure: true #chunksize: 10M #rootdirectory: rootdirectory imagePullPolicy: IfNotPresentlogLevel: debug# Harbor admin 初始密码,Harbor 启动后通过 Portal 修改该密码 harborAdminPassword: "Harbor12345" # 用于加密的一个 secret key,必须是一个16位的字符串 secretKey: "not-a-secure-key" # 如果你通过"ingress" 保留服务,则下面的Nginx不会被使用 nginx: image: repository: goharbor/nginx-photon tag: v1.7 .0 replicas: 1 # resources: # requests: # memory: 256Mi # cpu: 100m nodeSelector: { } tolerations: [] affinity: { } ## 额外的 Deployment 的一些 annotations podAnnotations: { } portal: image: repository: goharbor/harbor-portal tag: v1.7 .0 replicas: 1 # resources: # requests: # memory: 256Mi # cpu: 100m nodeSelector: { } tolerations: [] affinity: { } podAnnotations: { } core: image: repository: goharbor/harbor-core tag: v1.7 .0 replicas: 1 # resources: # requests: # memory: 256Mi # cpu: 100m nodeSelector: { } tolerations: [] affinity: { } podAnnotations: { } adminserver: image: repository: goharbor/harbor-adminserver tag: v1.7 .0 replicas: 1 # resources: # requests: # memory: 256Mi # cpu: 100m nodeSelector: { } tolerations: [] affinity: { } podAnnotations: { } jobservice: image: repository: goharbor/harbor-jobservice tag: v1.7 .0 replicas: 1 maxJobWorkers: 10 # jobs 的日志收集器:"file" , "database" or "stdout" jobLogger: file# resources: # requests: # memory: 256Mi # cpu: 100m nodeSelector: { } tolerations: [] affinity: { } podAnnotations: { } registry: registry: image: repository: goharbor/registry-photon tag: v2.6 .2 -v1.7 .0 controller: image: repository: goharbor/harbor-registryctl tag: v1.7 .0 replicas: 1 nodeSelector: { } tolerations: [] affinity: { } podAnnotations: { } chartmuseum: enabled: true image: repository: goharbor/chartmuseum-photon tag: v0.7 .1 -v1.7 .0 replicas: 1 # resources: # requests: # memory: 256Mi # cpu: 100m nodeSelector: { } tolerations: [] affinity: { } podAnnotations: { } clair: enabled: true image: repository: goharbor/clair-photon tag: v2.0 .7 -v1.7 .0 replicas: 1 # 用于从 Internet 更新漏洞数据库的http(s)代理 httpProxy: httpsProxy: # clair 更新程序的间隔,单位为小时,设置为0来禁用 updatersInterval: 12 # resources: # requests: # memory: 256Mi # cpu: 100m nodeSelector: { } tolerations: [] affinity: { } podAnnotations: { } notary: enabled: true server: image: repository: goharbor/notary-server-photon tag: v0.6 .1 -v1.7 .0 replicas: 1 # resources: # requests: # memory: 256Mi # cpu: 100m signer: image: repository: goharbor/notary-signer-photon tag: v0.6 .1 -v1.7 .0 replicas: 1 # resources: # requests: # memory: 256Mi # cpu: 100m nodeSelector: { } tolerations: [] affinity: { } podAnnotations: { } database: # 如果使用外部的数据库,则设置 type=external,然后填写 external 区域的一些连接信息 type: internal internal: image: repository: goharbor/harbor-db tag: v1.7 .0 # 内部的数据库的初始化超级用户的密码 password: "changeit" # resources: # requests: # memory: 256Mi # cpu: 100m nodeSelector: { } tolerations: [] affinity: { } external: host: "192.168.0.1" port: "5432" username: "user" password: "password" coreDatabase: "registry" clairDatabase: "clair" notaryServerDatabase: "notary_server" notarySignerDatabase: "notary_signer" sslmode: "disable" podAnnotations: { } redis: # 如果使用外部的 Redis 服务,设置 type=external,然后补充 external 部分的连接信息。 type: internal internal: image: repository: goharbor/redis-photon tag: v1.7 .0 # resources: # requests: # memory: 256Mi # cpu: 100m nodeSelector: { } tolerations: [] affinity: { } external: host: "192.168.0.2" port: "6379" # coreDatabaseIndex 必须设置为0 coreDatabaseIndex: "0" jobserviceDatabaseIndex: "1" registryDatabaseIndex: "2" chartmuseumDatabaseIndex: "3" password: "" podAnnotations: { }
有了上面的配置说明,则我们可以根据自己的需求来覆盖上面的值,比如我们这里新建一个 qikqiak-values.yaml 的文件,文件内容如下:
1
2
3
4
5
6
7
8
9
10
11
12
13
14
15
16
17
18
19
20
21
22
23
24
25
26
27
28
29
expose: type: ingress tls: enabled: true ingress: hosts: core: registry.ljjyy.com notary: notary.ljjyy.com annotations: kubernetes.io/ ingress.class: "traefik" ingress.kubernetes.io/ ssl-redirect: "true" ingress.kubernetes.io/ proxy-body-size: "0" externalURL: https://registry.ljjyy.com persistence: enabled: true resourcePolicy: "keep" persistentVolumeClaim: registry: storageClass: "harbor-data" chartmuseum: storageClass: "harbor-data" jobservice: storageClass: "harbor-data" database: storageClass: "harbor-data" redis: storageClass: "harbor-data"
其中需要我们定制的部分很少,我们将域名替换成我们自己的,使用默认的 Ingress 方式暴露服务,其他需要我们手动配置的部分就是数据持久化的部分,我们需要提前为上面的这些服务创建好可用的 PVC 或者 StorageClass 对象,比如我们这里使用一个名为 harbor-data 的 StorageClass 资源对象,当然也可以根据我们实际的需求修改 accessMode 或者存储容量:(harbor-data-sc.yaml)
1
2
3
4
5
apiVersion: storage.k8s.io/v1 kind: StorageClassmetadata: name: harbor-data provisioner: fuseim.pri/ ifs
先新建上面的 StorageClass 资源对象:
1
2
$ kubectl create -f harbor-data-sc.yaml storageclass.storage .k8s .io "harbor-data" created
创建完成后,使用上面自定义的 values 文件安装:
1
2
3
4
5
6
7
8
9
10
11
12
13
14
15
16
17
18
19
20
21
22
23
24
25
26
27
28
29
30
31
32
33
34
35
36
37
38
39
40
41
42
43
44
45
46
47
48
49
50
51
52
53
54
55
56
57
58
59
60
61
62
63
64
65
66
67
68
69
70
71
72
73
74
75
76
77
78
79
80
81
82
83
84
85
86
87
$ helm install --name harbor -f qikqiak-values.yaml . --namespace kube-ops NAME: harbor LAST DEPLOYED: Fri Feb 22 22:39:22 2019 NAMESPACE: kube-ops STATUS: DEPLOYED RESOURCES: ==> v1/StatefulSet NAME DESIRED CURRENT AGE harbor-harbor-database 1 1 0s harbor-harbor-redis 1 1 0s ==> v1beta1/Ingress NAME HOSTS ADDRESS PORTS AGE harbor-harbor-ingress registry.ljjyy.com,notary.ljjyy.com 80, 443 0s ==> v1/Pod(related) NAME READY STATUS RESTARTS AGE harbor-harbor-adminserver-58c855568c-jnpvq 0/1 ContainerCreating 0 0s harbor-harbor-chartmuseum-58d6c9b898-4csmd 0/1 Pending 0 0s harbor-harbor-clair-5c7689585-hd2br 0/1 ContainerCreating 0 0s harbor-harbor-core-6f56879469-rbthd 0/1 ContainerCreating 0 0s harbor-harbor-jobservice-74d7795cdb-bhzdm 0/1 ContainerCreating 0 0s harbor-harbor-notary-server-69cdbdfb56-ggc49 0/1 Pending 0 0s harbor-harbor-notary-signer-8499dc4db7-f78cd 0/1 Pending 0 0s harbor-harbor-portal-55c45c558d-dmj48 0/1 Pending 0 0s harbor-harbor-registry-5569fcbf78-5grds 0/2 Pending 0 0s harbor-harbor-database-0 0/1 Pending 0 0s harbor-harbor-redis-0 0/1 Pending 0 0s ==> v1/Secret NAME TYPE DATA AGE harbor-harbor-adminserver Opaque 4 1s harbor-harbor-chartmuseum Opaque 1 1s harbor-harbor-core Opaque 4 1s harbor-harbor-database Opaque 1 1s harbor-harbor-ingress kubernetes.io/tls 3 1s harbor-harbor-jobservice Opaque 1 1s harbor-harbor-registry Opaque 1 1s ==> v1/ConfigMap NAME DATA AGE harbor-harbor-adminserver 39 1s harbor-harbor-chartmuseum 24 1s harbor-harbor-clair 1 1s harbor-harbor-core 1 1s harbor-harbor-jobservice 1 1s harbor-harbor-notary-server 5 1s harbor-harbor-registry 2 1s ==> v1/PersistentVolumeClaim NAME STATUS VOLUME CAPACITY ACCESS MODES STORAGECLASS AGE harbor-harbor-chartmuseum Pending harbor-data 1s harbor-harbor-jobservice Bound pvc-a8a35d0e-36af-11e9-bcd8-525400db4df7 1Gi RWO harbor-data 1s harbor-harbor-registry Bound pvc-a8a466e9-36af-11e9-bcd8-525400db4df7 5Gi RWO harbor-data 1s ==> v1/Service NAME TYPE CLUSTER-IP EXTERNAL-IP PORT(S) AGE harbor-harbor-adminserver ClusterIP 10.108.3.242 <none> 80/TCP 1s harbor-harbor-chartmuseum ClusterIP 10.101.49.103 <none> 80/TCP 1s harbor-harbor-clair ClusterIP 10.110.173.153 <none> 6060/TCP 1s harbor-harbor-core ClusterIP 10.105.178.198 <none> 80/TCP 1s harbor-harbor-database ClusterIP 10.102.101.155 <none> 5432/TCP 0s harbor-harbor-jobservice ClusterIP 10.100.127.32 <none> 80/TCP 0s harbor-harbor-notary-server ClusterIP 10.105.25.64 <none> 4443/TCP 0s harbor-harbor-notary-signer ClusterIP 10.108.92.82 <none> 7899/TCP 0s harbor-harbor-portal ClusterIP 10.103.111.161 <none> 80/TCP 0s harbor-harbor-redis ClusterIP 10.107.205.3 <none> 6379/TCP 0s harbor-harbor-registry ClusterIP 10.100.87.29 <none> 5000/TCP,8080/TCP 0s ==> v1/Deployment NAME DESIRED CURRENT UP-TO-DATE AVAILABLE AGE harbor-harbor-adminserver 1 1 1 0 0s harbor-harbor-chartmuseum 1 1 1 0 0s harbor-harbor-clair 1 1 1 0 0s harbor-harbor-core 1 1 1 0 0s harbor-harbor-jobservice 1 1 1 0 0s harbor-harbor-notary-server 1 1 1 0 0s harbor-harbor-notary-signer 1 1 1 0 0s harbor-harbor-portal 1 1 1 0 0s harbor-harbor-registry 1 0 0 0 0s NOTES: Please wait for several minutes for Harbor deployment to complete. Then you should be able to visit the Harbor portal at https://registry.ljjyy.com. For more details, please visit https://github.com/goharbor/harbor.
上面是我们通过 Helm 安装所有涉及到的一些资源对象,稍微等一会儿,就可以安装成功了,查看对应的 Pod 状态:
1
2
3
4
5
6
7
8
9
10
11
12
13
$ kubectl get pods -n kube-ops NAME READY STATUS RESTARTS AGE harbor-harbor-adminserver-58 c855568c-7 dqqb 1/1 Running 0 37m harbor-harbor-chartmuseum-58 d6c9b898-4 csmd 1/1 Running 0 49m harbor-harbor-clair-5 c7689585-hd2br 1/1 Running 0 49m harbor-harbor-core-6 f56879469-rbthd 1/1 Running 8 49m harbor-harbor-database-0 1/1 Running 0 49m harbor-harbor-jobservice-74 d7795cdb-bhzdm 1/1 Running 7 49m harbor-harbor-notary-server-69 cdbdfb56-vklbt 1/1 Running 0 20m harbor-harbor-notary-signer-8499 dc4db7-f78cd 1/1 Running 0 49m harbor-harbor-portal-55 c45c558d-dmj48 1/1 Running 0 49m harbor-harbor-redis-0 1/1 Running 0 49m harbor-harbor-registry-5569 fcbf78-5 grds 2/2 Running 0 49m
现在都是Running状态了,都成功运行起来了,查看下对应的 Ingress 对象:
1
2
3
$ kubectl get ingress -n kube-ops NAME HOSTS ADDRESS PORTS AGE harbor-harbor-ingress registry.ljjyy .com ,notary.ljjyy .com 80 , 443 50 m
如果你有自己的真正的域名,则将上面的两个域名解析到你的任意一个 Ingress Controller 的 Pod 所在的节点即可,我们这里为了演示方便,还是自己在本地的/etc/hosts里面添加上registry.ljjyy.com和notary.ljjyy.com的映射。
在第一次安装的时候比较顺畅,后面安装总是不成功,查看数据库的 Pod 日志出现**database “registry” does not exist()**的错误信息,如果 registry 数据库没有自动创建,我们可以进入数据库 Pod 中手动创建:
1
2
3
4
5
6
7
8
9
10
11
12
13
14
# 1. 进入数据库 Pod $ kubectl exec -it harbor-harbor-database -0 -n kube-ops /bin/bash # 2. 连接数据库 root [ / ]# psql psql (9.6 .10 ) Type "help" for help.# 3. 创建 registry 数据库 postgres=# CREATE DATABASE registry ENCODING 'UTF8' ; CREATE DATABASE postgres=# \c registry; You are now connected to database "registry" as user "postgres". registry=# CREATE TABLE schema_migrations(version bigint not null primary key , dirty boolean not null ); CREATE TABLE registry-# \quit
Harbor Portal 添加完成后,在浏览器中输入registry.ljjyy.com就可以打开熟悉的 Harbor 的 Portal 界面了,当然我们配置的 Ingress 中会强制跳转到 https,所以如果你的浏览器有什么安全限制的话,需要信任我们这里 Ingress 对应的证书,证书文件可以通过查看 Secret 资源对象获取:
然后输入用户名:admin,密码:Harbor12345(当然我们也可以通过 Helm 安装的时候自己覆盖 harborAdminPassword)即可登录进入 Portal 首页:
我们可以看到有很多功能,默认情况下会有一个名叫library的项目,改项目默认是公开访问权限的,进入项目可以看到里面还有 Helm Chart 包的管理,可以手动在这里上传,也可以对改项目里面的镜像进行一些配置,比如是否开启自动扫描镜像功能:
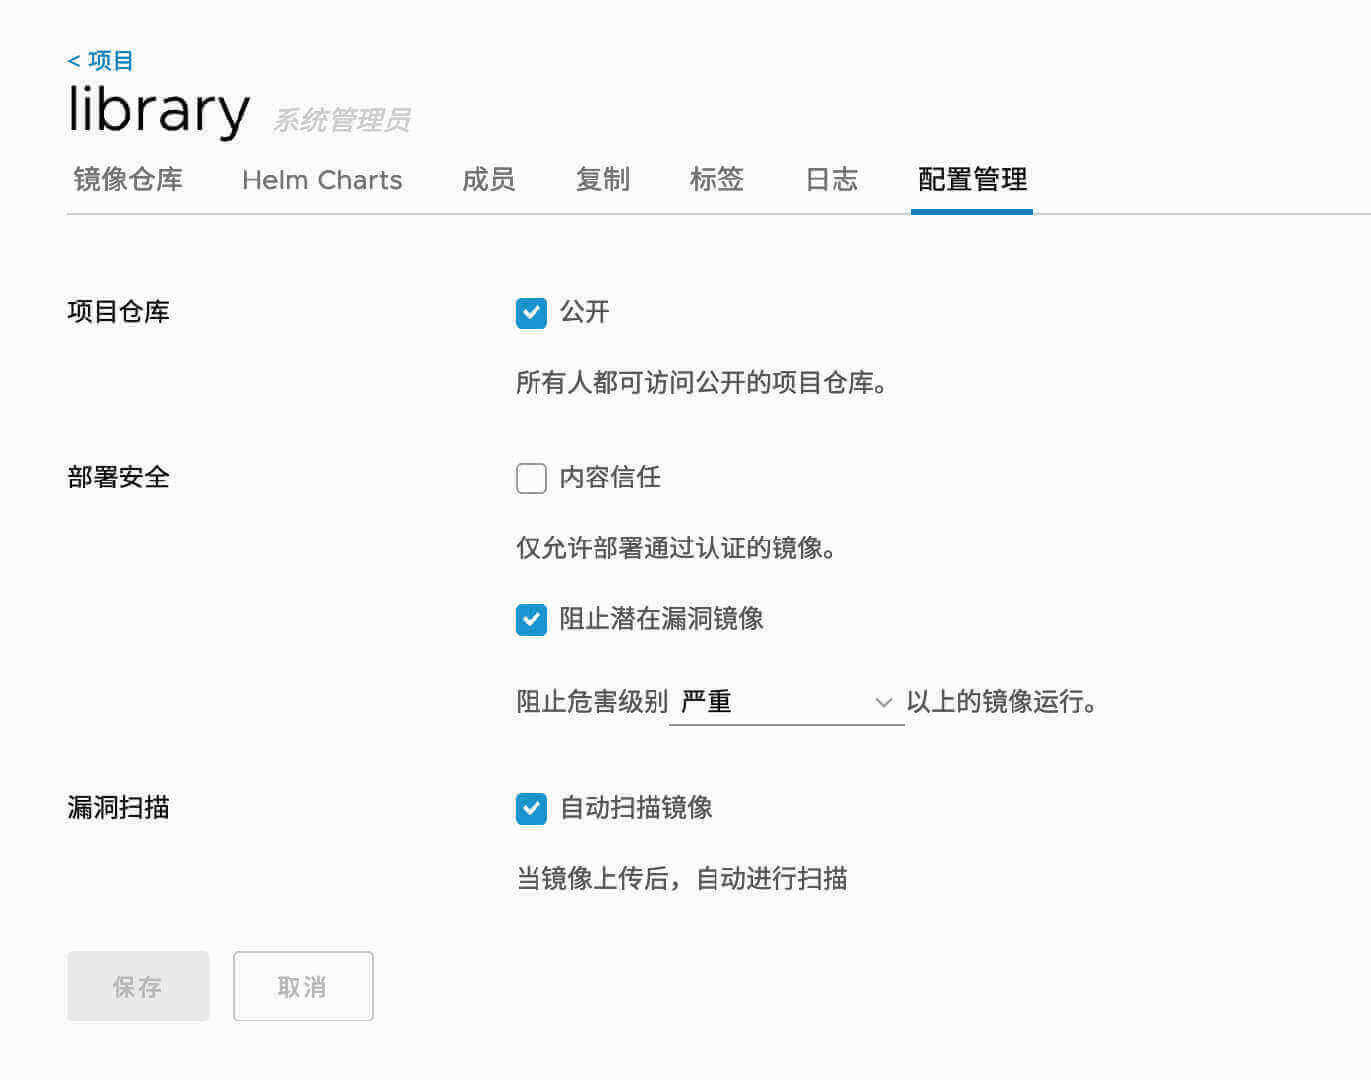
Harbor project settings
docker cli 然后我们来测试下使用 docker cli 来进行 pull/push 镜像,由于上面我们安装的时候通过 Ingress 来暴露的 Harbor 的服务,而且强制使用了 https,所以如果我们要在终端中使用我们这里的私有仓库的话,就需要配置上相应的证书:
1
2
3
4
5
6
7
$ docker login registry.ljjyy.comWarning: failed to get default registry endpoint from daemon (Cannot connect to the Docker daemon at unix: Username: admin Password: INFO[0007 ] Error logging in to v2 endpoint, trying next endpoint: Get https: INFO[0007 ] Error logging in to v1 endpoint, trying next endpoint: Get https: Get https:
这是因为我们没有提供证书文件,我们将使用到的ca.crt文件复制到/etc/docker/certs.d/registry.ljjyy.com目录下面,如果该目录不存在,则创建它。ca.crt 这个证书文件我们可以通过 Ingress 中使用的 Secret 资源对象来提供:
1
2
3
4
5
6
7
8
9
10
11
12
13
14
15
16
17
18
19
20
$ kubectl get secret harbor-harbor-ingress - n kube-ops - o yaml apiVersion: v1data: ca.crt: < ca.crt> tls.crt: < tls.crt> tls.key: < tls.key> kind: Secretmetadata: creationTimestamp: 201 9-0 2-22 T14:39 :28 Z labels: app: harbor chart: harbor heritage: Tiller release: harbor name: harbor-harbor-ingress namespace: kube-ops resourceVersion: "50400208" selfLink: /api/v1/namespaces/kube-ops/secrets/harbor-harbor-ingress uid: a899c57a-36 af-11 e9-bcd8-525400 db4df7 type: kubernetes.io/ tls
其中 data 区域中 ca.crt 对应的值就是我们需要证书,不过需要注意还需要做一个 base64 的解码,这样证书配置上以后就可以正常访问了。
不过由于上面的方法较为繁琐,所以一般情况下面我们在使用 docker cli 的时候是在 docker 启动参数后面添加一个--insecure-registry参数来忽略证书的校验的,在 docker 启动配置文件/usr/lib/systemd/system/docker.service中修改ExecStart的启动参数:
1 ExecStart =/ usr/bin/dockerd --insecure-registry registry.ljjyy.com
然后保存重启 docker,再使用 docker cli 就没有任何问题了:
1
2
3
4
$ docker login registry.ljjyy.com Username: adminPassword: Login Succeeded
比如我们本地现在有一个名为 busybox 的镜像,现在我们想要将该镜像推送到我们的私有仓库中去,应该怎样操作呢?首先我们需要给该镜像重新打一个 registry.ljjyy.com 的前缀,然后推送的时候就可以识别到推送到哪个镜像仓库:
1
2
3
4
5
$ docker tag busybox registry.ljjyy.com/library/ busybox $ docker push registry.ljjyy.com/library/ busybox The push refers to repository [registry.ljjyy.com/library/ busybox] adab5d09ba79: Pushed latest: digest: sha256:4415 a904b1aca178c2450fd54928ab362825e863c0ad5452fd020e92f7a6a47e size : 527
推送完成后,我们同样可以在 Portal 页面上看到这个镜像的信息:
镜像 push 成功,同样可以测试下 pull:
1
2
3
4
5
6
7
8
9
10
11
12
$ docker rmi registry.ljjyy.com/library/ busybox Untagged: registry.ljjyy.com/library/ busybox:latestUntagged: registry.ljjyy.com/library/ busybox@sha256:4415 a904b1aca178c2450fd54928ab362825e863c0ad5452fd020e92f7a6a47e$ docker pull registry.ljjyy.com/library/ busybox:latest latest: Pulling from library/busyboxDigest: sha256:4415 a904b1aca178c2450fd54928ab362825e863c0ad5452fd020e92f7a6a47eStatus: Downloaded newer image for registry.ljjyy.com/library/ busybox:latest$ docker images |grep busybox busybox latest d8233ab899d4 7 days ago 1.2 MB registry.ljjyy.com/library/ busybox latest d8233ab899d4 7 days ago 1.2 MB
到这里证明上面我们的私有 docker 仓库搭建成功了,大家可以尝试去创建一个私有的项目,然后创建一个新的用户,使用这个用户来进行 pull/push 镜像,Harbor 还具有其他的一些功能,比如镜像复制,大家可以自行测试,感受下 Harbor 和官方自带的 registry 仓库的差别。
接下文: kubernetes CI/CD建设之 五.Gitlab